"And my people shall dwell in a peaceable habitation, and in sure dwellings, and in quiet resting places." Isaiah 32:18
Showing posts with label What's Cookin'?. Show all posts

Sunday, February 12, 2017

The Sap Run

I know, I know.....some of you folks are wondering what in the world is she talking about now?   Sap, as in the sap in trees.   To be more specific, I'm talking about the sap in maple trees.   And as for the "run" part, that just means the sap is coming from the ground and being drawn up into the trees.  

During the most frigid months of winter the sap is very slow to move inside the trees.   But when the temps rise above freezing during the day after being below 32 degrees at night, the sap starts to be drawn up into the trees.   Thus, the term, "run".   Ok, it's not running with legs, but it's traveling at a pretty good pace as you'll soon see.

Two years ago I had read how you could tap black walnut trees.   Yes, I was surprised about that too.   I had always had the impression you could only get syrup from Sugar maple trees.   Well, there are more than a dozen varieties of trees that can be tapped for their sap and then cook it down to create syrup.  Who knew?!?   Well, we bought taps from a company in Canada and after some trial and error we made syrup from our black walnut trees.   And was it ever yummy!   It tasted just like maple syrup and nutty at the same time.

Now, why, you ask, didn't we tap our maple trees that winter?   Duh!   We hadn't been living on the farm that long and without the leaves on the trees I couldn't tell which trees were maple, oak, beech or shagbark hickory.  (Yes, we have quite a few of those.)  I made a point of watching all of our trees close to the house this year during late summer and fall to clarify in my mind which trees I wanted to tap this year.   Oh, yeah.  And I missed the "run" last year because the weather warmed up so fast and the run was done before we had a chance to catch the sap.

And so last week Joel and I decided it was time to tap the maples and give them a try this year.   We had been saving milk jugs since early December.   Yes, they are the stars of our Exclusive line of Sap Collectors.  Very chic, indeed!  
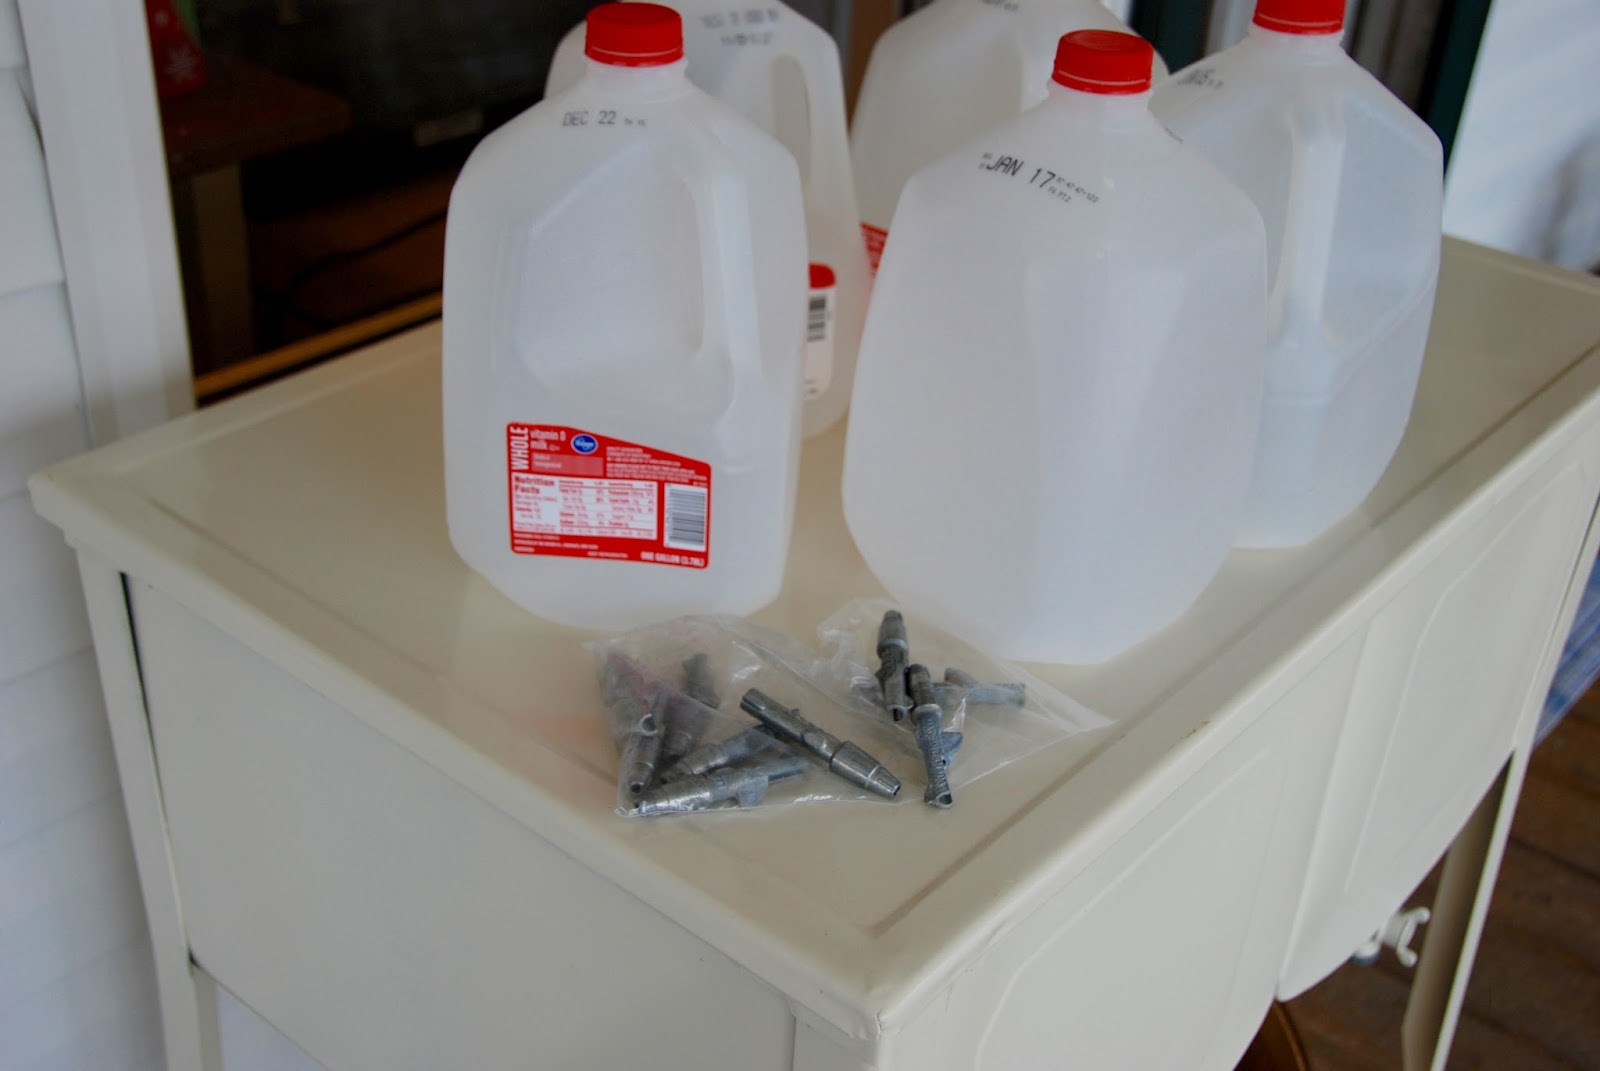
And the core hardware used in sap collecting is these little beauties.   They are well made metal tap, and hollow inside which allows the sap to run from inside the tree down into our collection containers.
These taps are made in Canada(they do a lot of syrup making up there) and are designed to be driven into the tree after a hole is drilled.  If you don't drill the hole first, and simply drive the tap into the tree, the wood clogs up the tap.  And then there would be no sap coming out of the tap.
First you drill the hole "up" at an angle and a little over an inch into the tree.   Don't worry, this doesn't harm the tree and the holes seal up on their own once the tap is removed.
Then you "tap" the tap into the hole with a hammer, leaving enough space behind the ridge on the tap for the milk jug, er, um, our Exclusive Sap Collector to hang.
Before you start running around tapping trees, though, you need to make sure the tree is at least 14" in diameter so as not to harm a younger tree.   This particular tree is inside the fencing of the potager garden.   Late this fall we moved the swing into the potager so I could sit there and look down over our valley.   The swing made a great place to hold all of our equipment while we drilled the holes.
Then Joel cut a specialty hole.....ok, so it's just a triangle, but that took some skill.  Tee-hee.   Not too big or the jug will blow off the tap in the almost constant winds we have here.
See the drip getting ready to fall off the tap?   Yes, well, that was after less than 30 seconds of being in the tree.   Oh, yeah, baby, we hit the timing just right this year.  Notice the ridge at the top of the tap.   That is an integral part of this simple operation.   Great design by those guys in Canada, by the way.
My Tree Tapping Expert lines up the hole in the jug with the tap and slides it on, making sure the edge of the milk carton is over the lip of the ridge at the top of the tap.   And that's all that holds the carton onto the tap until we come out to empty the contents twice a day.   We've only had one carton that has blown off so far, dumping it's liquid on the ground.
See the sap at the bottom of this jug?   That was what had collected in the time it took us to drill the four holes and install the jugs on this much larger tree out in our front yard.   It's really surprising how fast the sap runs.   If you put some on your finger and taste it, it mostly tastes like water with just a hint of sweetness on your tongue.   Sap is somewhere in the range of 94-95% water which is why it needs to be boiled down to evaporate the water and what you are left with is syrup.
Since this tree in our front yard has a diameter of somewhere in the neighborhood of 20" we could put 4 jugs on it.   Oh, I forgot to mention that the idea is to put your tap somewhere above a large root coming out of the ground.   This tree had so many large roots that we could put a tap almost anywhere around the tree.   We noticed there were old holes made by a bird called....wait for it.....a Sap Sucker.   Some of those holes were actually seeping sap down the sides of the tree.  Yes, we hit the run at just the right time.
So this year we are only tapping the maples and only two trees, at that.   Remarkably, the sap has been running so fast and furious that I have had to empty the jugs twice a day.   And where do I empty them?    Into the largest pots I have that will fit into our spare refrigerator down in the pavilion.  

There is just one problem.   We have collected so much sap in a week that the refrigerator is full with the largest pots I own, each of them filled to the brim with clear sap.   Sigh, such a good problem to have!    The sap needs to be kept cold so it doesn't get moldy, which means I can't just set it out in the open because our temps have been fluctuating into the 50's here lately.  

You know what that means, don't you?   Yes, we had to start boiling down the sap yesterday to make room for more in the refrigerator.   Here's how it works.   You sit outside, get the biggest burners you have and put the pots on top and sit and watch for hours as the sap boils down.   The 94% water in the sap evaporates from the pot and as it does the sap turns from a clear color to a soft yellow to an amber.

The pots need to be watched so they don't boil down to nothing which would ruin the batch.   Once the liquid in the pot boils down to about 2" more sap is added and the process begins all over again.   Wash, rinse, repeat.  For hours.    Like 4-6 hours.   On a dreary, damp, windy day.   While we drink coffee and sit in our comfy lawn chairs and read a book.  

Every once in a while I take a fine meshed sieve and scoop out any froth that collects on the surface of each boiling pot.   Our goal this weekend is to cook down the almost 15 gallons of sap we have collected in a week so it fits into a small pot which will go back into the refrigerator.    We will repeat this process every week as long as the sap is running clear in the trees.   Once the sap collecting in our jugs turns cloudy the run is over.

The very last step in this process is to take the amber liquid we have spent hours cooking down and bring it into the house where we will refine the final stages of creating syrup.    I'll post more on that in the weeks to come, complete with pictures for you to see our progress.   And now you know what we are doing this weekend.  

I'm sure it won't be long before I can show you pictures of the final stages of our syrup making process.   Until then, we'll keep on collecting sap and boiling it down.   It'll be interesting to see how much syrup our work yields this year.

Sticky fingers,
Debbie

Friday, April 3, 2015

Violets Everywhere

I know it's Spring now, for sure, as the wild violets have begun popping up all over 2 separate areas of our yard.   Last year when they bloomed, I was so surprised to see them and simply admired them each day as I walked around outdoors.   But this year I knew I'd be doing more than only admiring them.   This year I am harvesting them. 

Yup.   Harvesting violets.   For what, you ask?   You see, you can use violets and their leaves to make tea.   Isn't that interesting?  Ok, maybe you don't think so, but I do.
It took about an hour to collect enough violets and leaves for the few yummies I wanted to make.   First, I pulled the stems off the flowers and placed the flower heads and leaves on one of my dehydrator trays.
I simply put the tray into the dehydrator and turned it on for 12 hours at 95 degrees.   The lower heat is used for herbs and delicate flowers.   By morning they were nice and crispy and ready to be put into a Ball jar for storage.  
By putting 6 dried flowers and 3-4 leaves in a teapot and adding boiling water, in 5 minutes you will have a lovely light blue shade of tea.   This recipe and many more for teas and tisanes are in a book by Cassie Liversidge entitled "Homegrown Tea".   I've grown many of the plants she suggests in the book and have enjoyed the tea from them over the winter.   This year I plan on expanding the teas I grow in the potager garden.
 And then there was one last item on my list of "try something new" with the violets.   First, the recipe required 2 cups of dark violet flowers pressed down in the measuring cup so as to make a dense and copious amount of violets.   That took a lot of violet picking!
The two cups of pressed violets were doused in 2 cups of boiling water and left to sit overnight to steep.   By morning the water was a beautiful deep shade of purple.   I squeezed the flowers so as to extract every single drop of purple water from them.   The violet water was put in a pot on the stove and I added 1/4 cup lemon juice and 4 cups sugar and brought the whole thing up to boil, stirring the whole time.   Once it boiled I added 3 oz. of liquid pectin and brought it up to a boil again for 2 minutes.   Then the liquid was ladled into canning jars and processed for 10 minutes. 

Voila!   Violet jelly!    Isn't it pretty?   How lovely it will be to bring this out to use for a tea party.  Can't.   Hardly.  Wait.

Just one more "food" to be found on the farm,
Who knew?
Deb

Wednesday, March 18, 2015

It Worked!

I know I tend to get excited about any of our new experiences here on our homestead.   But I am so happy to share our latest adventure with you.   Remember when we were doing this a few weeks ago?
Yes, that's Joel collecting the sap from one of our mature black walnut trees.....in our very exclusive sap buckets(yeah, the milk jugs).    We kept checking the jugs everyday for a few weeks until there was hardly any sap to collect as the "run" was over.   Every day we would pour the contents of each jug into the largest pot I had, my canner that we used for canning our veggies last fall.   And when that pot was full we used whatever vessels we could put our hands on to store the lovely clear stuff in our second refrigerator down in the pavilion.

Our icy, sleety, bitter cold weather seems to have disappeared and we've been blessed with some beautiful Spring-like days for almost a week.   Yesterday Joel and I decided we had a great window of opportunity to cook down all that sap as it was an especially sunny and warm day.   We figured that even if our attempt at making syrup didn't turn out, at least we would have learned something from the whole experience.

First, we set up our trusty camp stove and connected it to a propane tank out under the pavilion roof.  Then we brought out all the sap we had collected and poured about 2" into each of 2 pots.   From all I had read about making syrup, it's simply a matter of boiling off the 90%+ water in the sap and bringing the remaining liquid up to 7 degrees above boiling temp to create syrup.   Sounds simple enough, doesn't it?

We each brought out some reading material to help pass the time while we watched and waited and tended to the sap.   When the level of sap would get low I'd add some more from our stash and watch it come up to a boil again.   And so it went for the entire afternoon.  With each hour the liquid in the pots slowly began to change from a clear liquid to a light gold to a darker shade by the end of the afternoon.
In between checking on the boiling sap we both did a few chores and all in all we had a very productive day spent outside.  We even got my smallest garden cleaned up and fully mulched.   Whew!   One down, two to go.   But back to the boiling sap.....
Each time enough water had evaporated from the pot, the whole mixture would boil up furiously and we had to quickly add more sap to the pot.   And so it went until the last drop of sap was finally added to the boiling pots and cooked down to a light amber color.  Now it was time to take the remaining liquid into the house to finish off the syrup.

The book I read said to have a pot of boiling water going on the stove next to the cooking sap.  Altitude and barometric pressure can both change the boiling point of water, and we needed to know what our boiling point of water was so we could add 7 to that number.   Now, why, you ask, did we need to do that?   Well, our boiling point was 206 degrees yesterday.   And when you add 7 to that number you get 213 degrees.   For us, that day, 213 degrees was the temp we were shooting for on our candy thermometer that hung in our syrup.   Once the sap reached that temperature and had very small bubbles instead of large ones, we were done!
And this is what that looked like.   How about that?    It was as simple as that.   I had already prepared some Ball jars and lids by scrubbing them in hot soapy water and poured the syrup thru a fine meshed sieve right into the waiting jars.  
We all did a taste test to see what our newest concoction tasted like and it was a unanimous decision that we three loved it!   The syrup has a rich color, is about the same consistency as high quality syrup I've purchased from Vermont in those adorable tins, and has a slightly nutty flavor.   I think we have a winner.  

Once again I am amazed at how hard our great-grandparents must have worked to provide food for their families, and without all our modern amenities to assist them, too.  Here is the tally of what it took for us to create our syrup:
1. About 2-1/2 weeks of collecting sap daily, sometimes twice a day.
2. We collected about 6 gallons of the clear liquid over that time frame.
3. Approximately 6 hours of cooking was required to boil down that liquid into syrup.
4. We netted a grand total of.........wait for it...........2 cups of liquid gold.  

Yes, 2 cups.   Now imagine how much more sap we would have had to collect and how much longer it would have taken to cook it down to produce enough syrup to be one of the sweeteners folks in the 1800's may have needed.   That's a lot of work for just one product in a list of many that we consume over the course of a year.   No wonder they went to bed as soon as the sun went down!

Still glad we did it,
Debbie
  

Sunday, January 18, 2015

Got Pork?

Giggle.....well, we do now.  And lots of it, too!   I already told you about the ordeal of loading the pigs into the trailer to go to the slaughter house.   Well, the friendly folks there called us Thursday morning to say that the meat from both pigs was ready to be picked up.  Yikes!  I thought we were going to get one at a time so I could figure out where to put it all.   Oh, well, may as well just jump in with both feet and figure this out as we go.
It was a little chilly out Thursday and we had snow flurries most of the day.  At least we didn't have to worry about the frozen meat sitting in the car as we worked on unloading it all into the freezers. 
At the slaughter house we watched in amazement (and with a little dismay) as 2 men and 1 of the women kept walking into the huge walk-in freezer and coming out with filled grocery bags of our pork.  And then they wheeled two 3 foot square dollies out of the freezer, loaded with even more pork!   Oh.   My.  I have to admit it was beginning to be a little overwhelming.
They all helped us load the pork into the back of my Tahoe and when we were finally done loading, the car was full.  Seriously.   Full.   The entire back of the car was pork heaven.    Now what?  Joel and I nervously laughed as we pulled out of the slaughter house, wondering if we were going to have enough freezer space to keep all this meat.
Well, we drove home and I put on my organizer hat and we made a plan.   Joel brought the bags into the pavilion where our trusty old freezer and refrigerator stand.   We weighed each bag and recorded it in a tablet so we know for future reference how much meat we netted from 2 pigs.
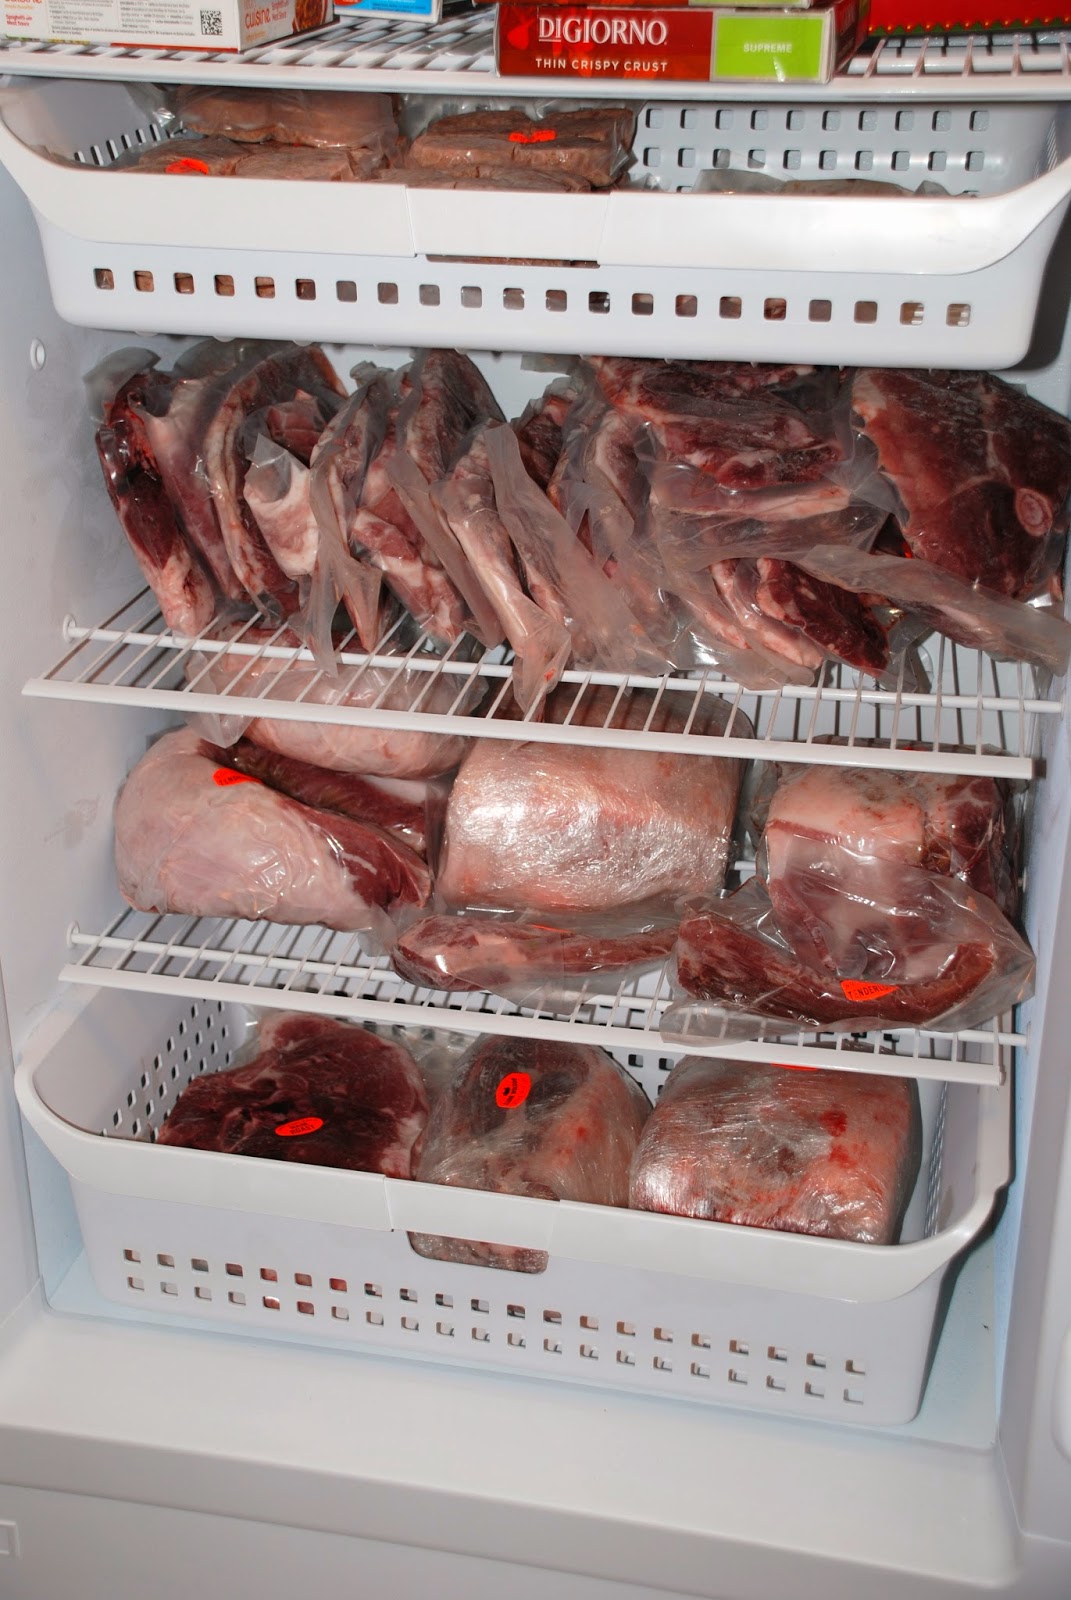
Our old refrigerator's side by side freezer became our overflow....thank goodness we had this.  Yup, those are all packages of sausage patties on the left hand door.   They are the ones I couldn't fit into the big upright freezer along with the other sausage.   You see, we had 4 grocery bags of sausage alone.    All 92 lbs. of it.   Yes, you read that right.   92 lbs. of sausage patties.   Yikes!
Yup, this freezer started out empty before we picked up the pork.   It's pretty full now.   We have everything from sausage patties to baby back ribs.   Tenderloin to ham steaks.   Smoked backbone for soups and hams.   Thin sliced ham for breakfast to boston butt.   And picnic roast to shoulder cuts.   Our Big Green Egg is going to be put to good use this next year, that's for sure.
We even have tons of bacon, already smoked and ready to cook up.   Here's our other freezer in the house.   At least now the meat is all arranged in an orderly fashion so I know where the different cuts of meat are on the shelves.   That should make it easier to locate what I need next time I want some pork for a dinner recipe.
Speaking of recipes......Saturday morning we three decided it was a good time to finally do some taste testing.   Nothing like a hearty breakfast on a leisurely Saturday to bring the family together.    I brought out the waffle iron and made up a batch of waffles while the bacon cooked in the oven.
I despise cooking bacon on top of the stove as it splatters all over everything within  a three foot radius.   To make bacon I turn my oven on at 425 degrees, line a baking sheet with foil, put a cake rack on top of the foil and lay the bacon strips on top of the rack. 

Now the bacon cooks up nice and lean as all the fat drips down onto the foil lined tray, leaving crisp bacon on top of the rack.   Clean up is a breeze, too, as all I have to do is remove the foil from the pan and wash the one rack.   Ta-da!  And no more bacon splatter all over the stove, counters and floor.
Ok, our concensus is that we love the sausage.....great flavor and we like the recipe they used to make it.   It may be a little salty, but that's ok.   The verdict is still out on the bacon.   It cooked up really nice, and we like the flavor but it's not as "bacon-y" as what we are used to buying from the grocery store.   I think it needs to be smoked again in our Big Green Egg.  I'll be experimenting with that over the next few months.   For the next year and beyond we will continue to try different cuts of the pork and experiment with recipes, both old and new.

Here are the stats for our first attempt at raising pigs.
Pork Chop weighed in at 388 lbs.   Hanging weight(after gutting, ugh!) was 297 lbs.
Bacon weighed in at 378 lbs.   Hanging weight was 274 lbs.

Total hanging weight was a whopping 571 lbs.   After the slaughter house removed bones, etc. and processed the pork, we carted home just over 421 lbs. of meat.   Yikes.   By the time the weather warms up we should be ready to have a real humdinger of a barbeque.   We certainly have enough meat for one!

I think next time we only need one pig, don't you?
Debbie

Tuesday, September 16, 2014

Phase One: Kitchen Cabinet Installation

Yes!  The cabinet guys were here today and began putting our kitchen back together again.  Can you say,"Debbie is so happy!"?

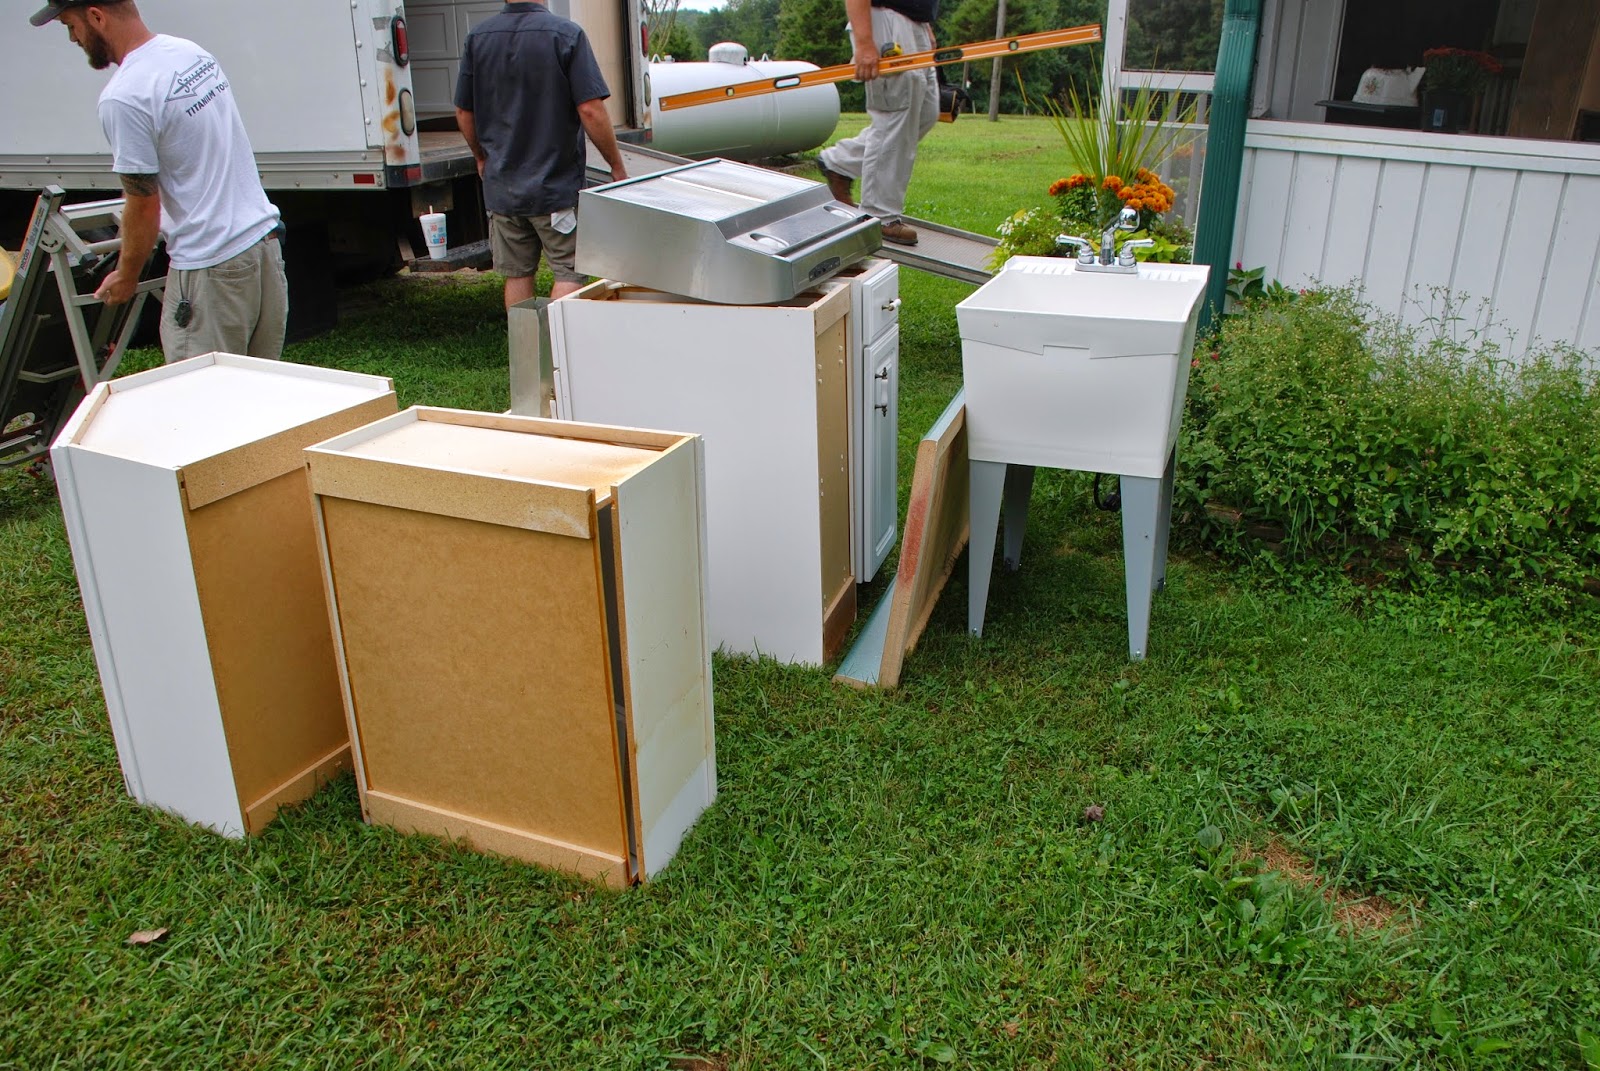
 But before any new cabinets could go in, the few remaining old ones had to be removed.   Boy, were we ever glad to see those bad boys go outside.  Not the cabinet installers, the old cabinets.  The installers were wonderful!
And now we're starting with a blank slate.   The door to the right is our laundry/butler's pantry where the canning shelves that Joel built and old cabinets are now in place.
As two of the cabinet guys were preparing to install the new cabinets, one of the men took on the task of repairing the sub-par work of a previous carpenter.    Right after we moved in, we hired someone to built this pantry surrounding the refrigerator.   On the right of the refrigerator is a bookshelf that holds all my cookbooks.   The problem is, the drawer slides were installed underneath the drawers instead of on the sides.....and the weight of the canned goods was causing the drawers to collapse.

Um, yeah.  Not good.   Especially since this is supposed to be a pantry.....a place for canned goods.   Hmmmmm......well, it took the better part of the morning but they now work like a dream.    Thanks to the conscientious  work of one young man.   It's amazing how well things work when they get installed as they were meant to be installed.

Another mistake we made was the paint color I choose.   It was too creamy and pretty much looked awful in our kitchen.   So our new guys took off the doors and they will get sanded nice and smooth(they were really rough, too) and repainted to match our new cabinets.  It's my job to use the paint they gave me to repaint the cabinet cases so when they return with the newly painted doors everything will match the new cabinets. 

They even removed the upper portion of the cookbook case so it could be properly sanded and painted in their shop.    Things are starting to look up now.  This will create a really polished kitchen that has all the same quality workmanship.
I just loved walking out to their truck and seeing all our new cabinets lined up, ready to be installed.
That's quite a pile of old cabinets, the one counter I used for the last 8 months and the utility sink.  Guess we'll repurpose the sink in my potting shed some day.   As for the cabinets....good riddance.   They went back with the cabinet guys.
Now for the fun stuff.    Drumroll, please.    The upper corner cupboard is the first to get installed and all the others build off of that one.  These guys were perfectionists about leveling everything.
I'm liking it already!   The right hand wall is where our new sink will go under the curved arch cabinet with the dishwasher to the right of the sink.    And there will be counters everywhere!!   Yippee!
Our guys even installed the stove hood that Joel spent hours and hours researching on the internet.   We were afraid it wasn't going to arrive until mid-October but we got a call late last week that the hood had arrived at the plumbing supply in Chattanooga, so we drove down there Friday to pick it up personally.   It was worth the trip so it could be put up right away.   One problem occurred, though, after it was up as the installers realized the two upper cabinets on either side of the hood were each 1" too wide.   Rats.   I felt really bad that they now have to remake those two cabinets so they will fit in the space remaining.
 Once again our rocking chair porch served as a staging area.   Out with the old folding tables we've used for 8 months and in with the new hood, sink, and cabinetry.
Ok, things are starting to take shape now with the lower cabinets in place.    I'm so excited to have real drawers and shelves and cupboards to store all our kitchen items that have been in boxes for over a year.   It's going to be wonderful to cook in a fully equipped kitchen sometime soon.
This is how far we got today.   After the guys cleared out their tools I took a few pics of the beginning of our brand new kitchen.   I kept pinching myself all day today because I could hardly believe all our planning finally resulted in our kitchen being transformed before my very eyes. 

The huge cabinet to the left is my baking center.   The wide drawers below will hold all kinds of baking tools while the upper cabinets will hold flour, sugar, etc.  The stove looks so pretty now with it's complementary hood(it's hard to tell in the pic but the hood has chrome rimming the curves up to the ceiling with a wide band of chrome in the lower front).  The center island will house my pots and pans and the baking sheets have their own special cabinet with pull out dividers to hold them in place.
The black beadboard behind the baking center has sanded edges to make it appear more aged.   So does the center island.  It'll be wonderful to have actual counters to work on once again.   Our old kitchen was a dream to cook in and I've missed the functionality of it.   I believe I'll have that once again in this smaller farmhouse kitchen.
Once the pantry is repainted and the doors are back in place it should marry seamlessly with the rest of the kitchen.  There will be a place for everything and everything will be in its' place.    Can't.  Hardly.  Wait.
And I almost forgot about the farmhouse sink!    This beauty is porcelain and should provide a lifetime of service.   Pretty soon it will be in working order and paired with a lovely faucet and sprayer.
Please ignore the ugly glue and various colored paint on the wall behind the stove.   As soon as the counters go in Joel and I will commence with the tiling.   Yes, we're going there again.   But we're good with that.   That's my story and I'm sticking to it.   Simple white subway tiles are all this kitchen seemed to call for and I think I'm going to enjoy the ease of cleaning with them in place.  

Now we just wait.....wait for the countertop folks to let me know what day they will be here to template for the counters.    And then the counters should be installed a week after that.   Then the plumber can hook up the sink and dishwasher and I should be fully functioning by that time!   And sometime in between the cabinet guys will be back to reinstall the doors they're painting for us and put up the 2 cabinets they had to rebuild.  Hopefully 2 weeks from now I'll be unpacking the remaining boxes from Florida and lovingly placing my kitchen tools in their new home.

But wait, there's more!   We got the call that the studio we ordered 8 weeks ago (it was supposed to be done in 4 weeks) is going to be delivered tomorrow morning.   Yes!   How crazy is that?   I had been hoping the studio would be here on time so we could work on one big project at a time.   Oh, well, what's the fun in that?

Going to bed early tonight,
Debbie

Monday, August 18, 2014

Peaceful Day

One of the benefits of living where we do is the peace, quiet and solitude that can be found by simply walking out our back screen door.   Today is one of those days I'd like to "can" so that when I feel stressed I can recall this wonderful feeling of contentment.   There is a mist covering the high spots of our valley below the farm and all I can hear when I step outside is the twittering of birds around our feeder.
The flowers hanging from the pavilion are giving up the last of their colorful blooms as August begins to fade into September.
And I noticed that the oak trees are getting ready to drop their steady supply of acorns.   A few trees have leaves that have started to turn yellow.   Wow, is Fall really that close?

 Yesterday Joel and I double-teamed the tomato picking in the garden and we managed to pick on just one side of the garden before the rains started.   The crazy thing is, we brought in 56 lbs. of tomatoes!  Yes!  I know....and you should see the green tomatoes yet to ripen.  
 That meant that today was "let's cook the tomatoes" day.   They all got a quick wash in the sink and cored.   Then I brought out my trusty gadget that separates the pulp from the seeds and skins.   It sure makes quick work of prepping the tomatoes for the cook pot.
The two largest pots have sauce simmering in them and the small pot in the front has paste tomatoes cooking down into a thick tomato paste.   Later today it will all get canned and processed for use later this winter.   I wonder how many lbs. of tomatoes are on the other side of the garden waiting for us?  

Even though picking, cleaning, cooking and canning all this produce means hours in the kitchen most days, I have to say that I am loving every single minute of it!    This has been a dream of mine for years and now it is my reality.  It brings me a feeling of deep satisfaction to grow these organic veggies that I know are nutrient dense because of the variety of plants we grew and the soil in which we have grown them.

Yesterday I also went out and dug up another 20 lbs. of potatoes.   Those needed to be canned in the pressure canner because they are so low in acid.   Now all I have to do to make mashed potatoes is open up a jar and heat and mash!   And potato salad only requires that the potatoes get drained and mayonnaise added.  It's worth the work up front to make meals so much easier to prepare the rest of the year.   I kept thinking I'd have the potatoes done by the time the tomatoes needed to be dealt with, but the constant rain kept me from digging them up.   Now I guess I'll be working on both at the same time.
Every once in a while a girl has to take a break and love on her favorite puppy, Molly.   I still can't believe how much I've grown attached to a dog.  A Dog!   I know!   Who knew there was a dog person hiding somewhere deep inside me? 

Ok, time to get back in the kitchen,
Debbie