"And my people shall dwell in a peaceable habitation, and in sure dwellings, and in quiet resting places." Isaiah 32:18
Showing posts with label Remodeling Projects. Show all posts

Thursday, March 9, 2017

Girls Can Do Projects, Too

There has been an awful lot of fuss in the news since the election.  Women demonstrating.....the issue seems to change from day to day.   I'm totally confused.     Seriously, there has never been a time in our world's history when women have so many options available to them.   Forget about politics.  Know this:  YOU CAN DO ANYTHING YOU PUT YOUR MIND TO!  I've never paid much attention to "the rules" that previously designated certain tasks as only for men or only for women.   So instead of demonstrating, girls, pick up your power tools and get the job done yourself.  You'll have a good time, really!

Which leads me to today's projects.  Honestly, ladies, don't let the guys have all the fun.  You men have been playing with tools your whole lives, so working with them comes more naturally to you.   But girls, for this project all you really need is a phillips screwdriver and you, too, can get in on the action.   And there's nothing more fulfilling than seeing a project  completed that you did all by yourself.
I know, I know.   What the heck, Debbie?   Yes, you're looking at a simple doorknob.   A very outdated doorknob.   A "1980's" era brass doorknob.  A doorknob that I have been wanting to be rid of for some time.

 Now, we live in a farmhouse.   A farmhouse that we have gradually been remodeling to suit our current tastes and needs.  If you watch HGTV or any of the hundreds of do-it-yourself shows you are probably already dreaming of projects of your very own.    For me, the creative juices in my brain are constantly coming up with ideas to bring more charm into our little house.   (Much to Joel's chagrin)  And one of those projects involves banishing any and all remnants of the 1980's decor.
I made a quick trip to Lowe's and picked up some door hardware which is conveniently packaged with everything you need inside it to change out a doorknob.   The only tool you really need for this job is a screwdriver but I also opted for using the drill to speed up the removal of the screws on the old knobs.   But really, no special tools are needed!
There are always instructions inside the doorknob packaging, but common sense tells you that first you need to remove the 2 screws which hold the old doorknob in place.   Done.
The doorknobs on either side of the door simply slide out of the door once those 2 screws are removed.   Easy- peasy, right?   Next, remove the screws that hold the remaining portion of the knob "works".  Notice I haven't a clue what in the world this part is called.   I just know it had to come out. Hey, laugh with me, not at me....giggle.
Don't forget to remove the strike plate on the door frame.   That's the metal piece that the door latches into once it's closed.   Here I've already replaced the old one with the pretty dark metal one.  Yea, making progress.
In reverse order replace the old parts with the new parts and using the enclosed screws, tighten up the knob so it doesn't wiggle.    It's all in the instructions.    And you're done!   How cool is that?    I replaced the knobs on 10 doors and now our house feels one step closer to "farm house appeal".
Oh, um, yes.   There's just one more thing.   When you change the color of your knobs you might want to consider also changing out the hinges.   They kinda stand out as not matching now that all the knobs are done.    So, it's back to Lowe's I go.....next week....I'm busy with other things now.  

But when you go to your store, bring along one of the hinges you have unscrewed from your door so you match the size and shape.    Who knew?   Yes, hinges come with either rounded corners or square ones.   You don't want to have to get into working with a chisel to take out wood from your door just to make the new hinges fit.  It's so much easier to buy hinges that are duplicates in shape to your old ones, then it's a simple matter of unscrewing the old hinges and replacing them one at a time.   You won't even have to remove the door that way!
Here's another quick and easy project that I recently finished up.   At Lowe's I bought a pull out metal shelf for under the kitchen sink.   I don't know about you, but that area of my kitchen is always a jumble of cleaners, brushes and a collection of who knows what.   And I despise having to get down on my knees to reach something in the far back corner of a dark cupboard.
Now I can easily glide the shelf out (it fully extends from inside the cabinet) and remove any item I need without ruining my already arthritic knees.   To install the shelf I first emptied all the items from under the sink.   Four screws were all it took to install the sliding base of the new shelf and you're done.   Seriously.   Less than 5 minutes.    And the messy area is now neatly organized.   Now that was a project worth doing!

Are you feeling empowered to do a project of your own now?   I certainly hope so.  You can do it!  And when you're at the home improvement store, why not buy yourself a new screwdriver or two?   I have been doing that over the last 2 years and now have my own collection of tools in a drawer of our butler's pantry.   That means I don't have to ask hubby for one of his tools when I need to do something inside the house.  

Love that feeling of accomplishment,
Debbie

Friday, February 24, 2017

And Then There Were Two

 Two what you ask?   Two decks, that is.    Joel and I decided that since we were on a roll, why not knock out another smaller deck?   And so we did.
After all, once you have all the tools out and most of the lumber required to make a smaller deck we figured we may as well just do it.   And besides, how could we not take advantage of this unseasonably warm February?   When we woke up this morning it was already 59 degrees!
So we built the box, strengthened it with joists and attached it to the existing step at the back door of the same screened porch as the first larger deck.   Our puppies have been having a hay-day digging up the yard in this part of the farm, so, we have been dragging a lot of mud and debris onto the porch.   Now we have a great way to step outside when we leave early each morning to take care of our animals.....at least 2 strides will be up out of the mud.
Even though we had to make a trip into town to buy 4 more 8' deck boards this afternoon, we still managed to finish up before dark.  It felt really good to put away all the tools knowing we wouldn't have to drag them out again to complete this project another day.   And I think the two new decks add a little something to the porch, too.  
I should back up a bit here to explain that before we could begin our second deck today we had to make a trip down off the Plateau to pick up our beef.   Yes, remember we took Beef Cake to the slaughter house 2 weeks ago?   Well, now our freezer is fully stocked with our very own beef.   We think this should last us at least the next year.  

Total beef count:(approx. count, I got tired of counting with my frozen fingers!)
 66-1(lb.) pkgs. of ground beef
20 pkgs. of cubed steak(2/pkg.)
14 pkgs. of rib eye steak(2/pkg.)
10 filets(2/pkg.)
15 pkgs. N.Y. Strips
2 large loin tip roasts
7 chuck roasts
2 rump roasts
2 round roasts
4 shoulder roasts
stew meat and ox tail(for ox tail soup.....one of my favorites)

We also got the heart and liver that we will cook up over the next months(there was a lot!!) and give to the dogs as a treat.  All in all we are pretty pleased with the cuts of meat we choose and are already figuring out what recipes we want to use first to sample the meats.

Whew!   What a day we had today.   While we are both bone tired, we love that we were able to finish up these projects before the weather turned on us again.   I just watched the forecast and we are supposed to get severe weather tonight and by Sunday morning we are going to be back down to 28 degrees.   Yup, winter's not over yet.
So please enjoy this pretty sunset over our roof as we haul our tired bodies off to bed.

Time for some couch time,
Debbie

Thursday, February 23, 2017

Time for Some Decking

You know how sometimes you have to live somewhere for a couple of years before you know exactly the kinds of DIY projects you want to tackle?    The kinds of projects that will neatly fit in with the way you live in your house day in and day out.   Well, we came up with just such a project and this one only took us three days from start to finish!   Hallelujah!

The main entry to our little farmhouse is thru the screened in porch on the back of our house near the parking area for our vehicles.    There is one step up before you enter the porch thru a screen door......a screen door that has a monster strong hydraulic closure feature.   Now, that feature is great to keep the door closed when the winds howl here.   But I cannot tell you how many times that sucker, er, ummmmm, that door has hit me in the ankles as I was juggling groceries, a purse and my keys.  

Joel and I also were tired of stepping off the porch in rainy/snowy/sleety weather to have the water surrounding the brick pavers at ground level just off the porch splash up muddy drops onto our pants and shoes.     The solution?    A deck!  Yes, we're simply brilliant, aren't we?    A deck would elevate us above the muck....and (she says, breathlessly...) we could make the step at the door level with the porch, eliminating the juggling act of stepping up and pushing against the insistent screen door whilst trying to not drop an armload of goodies.

Yes, we can do this, right?   You betcha!    So, off to Lowe's we go......loading our allotted amount of different boards into the back of Joel's truck.    Once we got home it was time to pull out all the necessary tools to make this baby come to fruition.    Thank goodness Joel owns just about every tool known to man....they sure do come in handy.
While Joel was retrieving his tools I got to work digging up the brick pavers.   Yea, no more mud splashing on my pants!
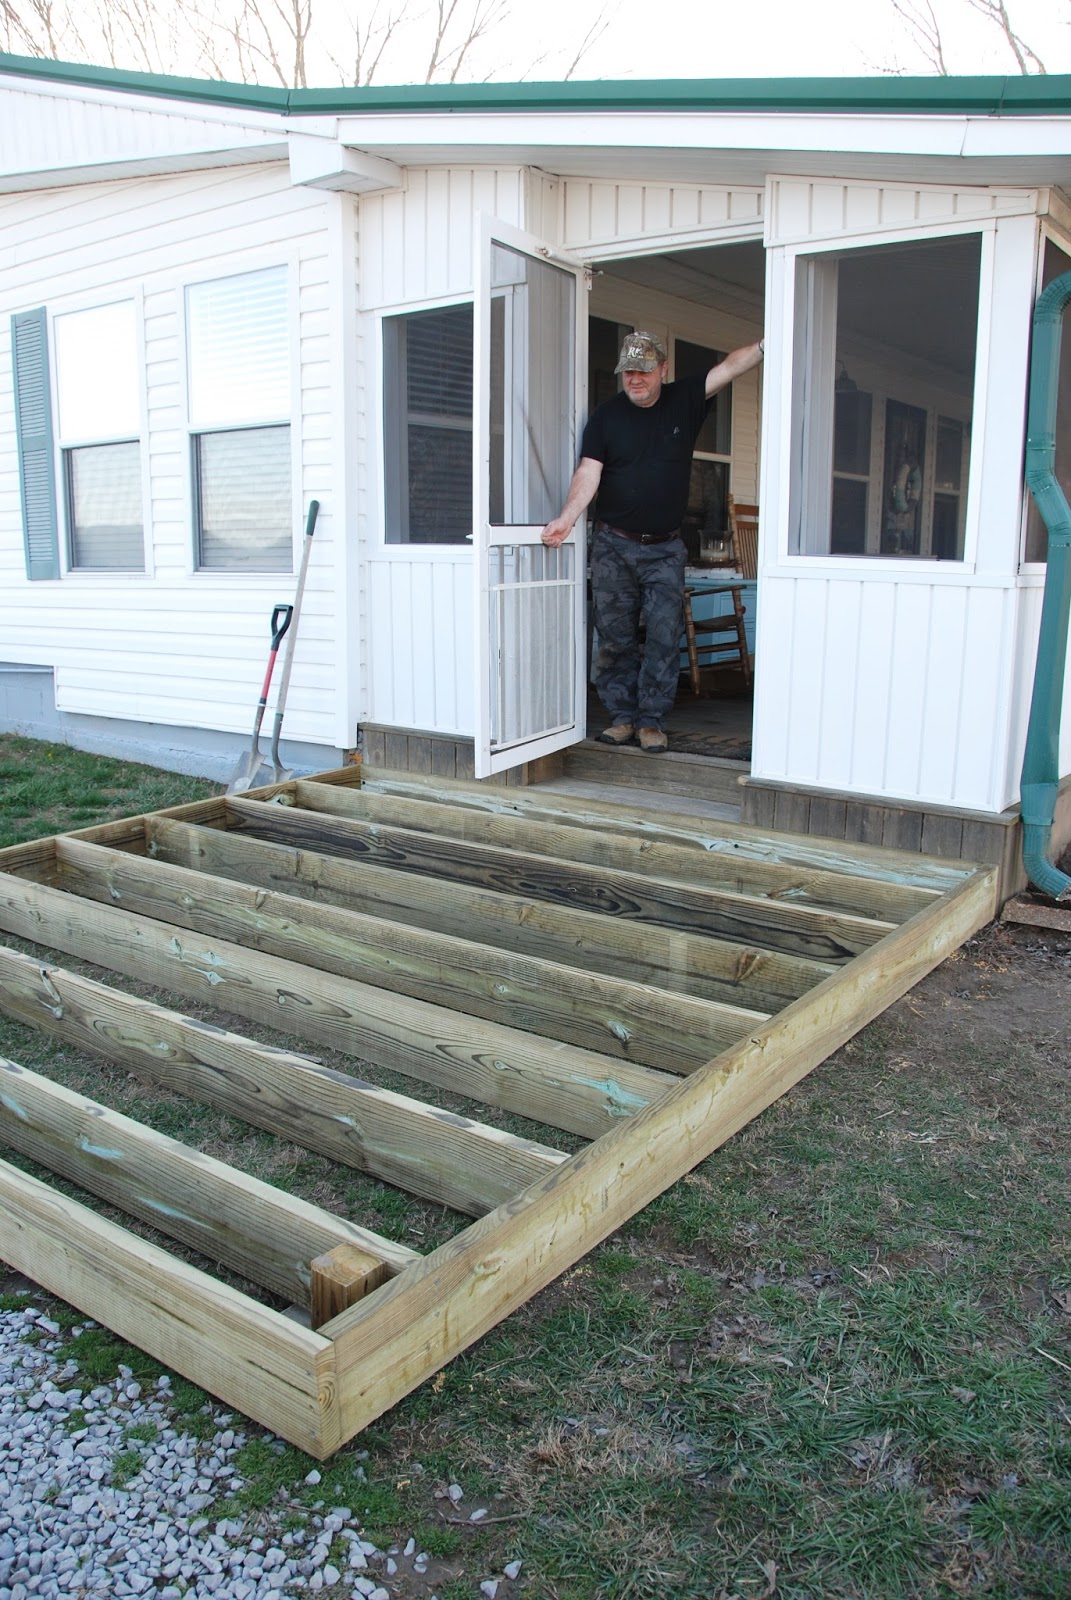
Next it was time to build the main box that would support the largest section of decking.   It got attached to the porch and supported with 4"x4" posts on cement.  We used levels to make sure the deck had some slope to it so the rain would drain off of it.
Of course every carpenter needs a helper....and Saber was more than happy to volunteer.  He got right up there in Joel's face.......it was as though he was saying, "Come on buddy, let me try that drill."
Things are looking good, wouldn't you say?    We had to take a little break for some lunch and it was nice to see how much progress we had made in just a few hours.
Yes, every job requires a bit of caffeine.   Joel likes his afternoon coffee hot and I like mine cold.   That board on the saw was just the right place to keep my drink away from the curious dogs.   And speaking of curious dogs.....look who settled down in between the boards while we were working.
 Once we had the main base built it was time to decide how large to make the smaller step up onto the porch.    The goal was to be able to stand level with the porch, open the screen door and walk inside without having to step up at the same time.   Hey, don't laugh, but we're doing all these projects with how we will be able to function as we age.   And the more we can reduce tripping hazards, the better. Ya' think?
Alright!   So we have a 10'x10' base with a 4'x4' step up onto the porch.   Everything is secured and nice and sturdy.   The joists are in and now it's time for the fun stuff.....decking!
Because Lowe's was out of 10' boards, they gave us 12' boards at the same price....that's why some of these are so long.   Pretty soon we'll have them all cut to the correct length.   But it's starting to look like a deck now, right?  I was getting pretty excited at this point.
Day two saw a lot of progress.   We got most of the decking down, holes drilled and screwed at each joist.   Oh, our aching knees and backs!   But it looked so great we kept going, what's a little pain?   Only the sliver of a board on each side of the 4'x4' box needs to be cut.  Oh, yea....and the step onto the porch, too.
That part wasn't so much fun.    You see, the screen door was flush with the original porch, but when we swung the door out onto the deck it got stuck.....darn it.
No problem.   We simply removed the screen door and cut some off the bottom.   After a little sanding of some high spots on the step into the porch, the door worked just fine.    Whew!   Glad that worked out ok.
So day three was finishing the upper small deck, filling in the couple of boards around the door, cutting off the door and sanding the boards and trim.   Well, not exactly trim, but the finishing touches that we feel make the deck look a bit more professional.    First, we snapped a chalk line on each deck so I had a straight edge to run the saw against.   That helped me cut off the excess wood at the end of both decks.

Next, I used the jig saw to round the corners...you know, so we don't bang the daylights out of our shins on the pointy corners of the decks.   Last, but not least, Joel ran the router around the edges to make them nice and rounded.   And with a quick swipe of the broom, we were done!
Soon we'll extend the railroad ties that butt up to our parking area filled with gravel all the way up to the deck.   One more load of gravel should help to fill in up to the deck at the lower end of the pic above.   Now I'm on the hunt for some farm-y accessories.....you know, things like galvanized tubs for either side of the small deck.   I think that will be the perfect place to put some seasonal flowers and plants to brighten up the space.  

Now our guests should have no doubt which door to use as an entry to our home.   And I no longer have to get muddy while making my way to the car.   The dogs sure seem to like the deck and they have made themselves quite at home on it as you can see Shadow happily chewing her bone there.

It was so nice to take advantage of the rare 65 degree February weather to complete this deck project.    But wait!   There's more!  

Stay tuned,
Debbie

Saturday, June 18, 2016

Pavilion Renovation

Seems there is always something on the farm that needs a bit of TLC.   This summer the pavilion moved way up on the list because the quilt guild I belong to had asked if we would host the annual picnic at our farm.   And the best place to seat a large group of women is under the pavilion.   So, let the clean up begin.   And begin it did in earnest 2 weeks ago.

Don't ask me why we waited until 2 weeks ago to do this huge task.    I blame half of it on Joel being a perpetual procrastinator and half of it on being so busy bringing Buttercup into our lives.   At any rate, we dug into the painting and cleaning with gusto.    Especially since we were expecting 80 women to come to the picnic!
One of the first things we had to address was the wear and tear on the paint job of the main structural posts of the pavilion.    We washed both the house and the pavilion with a wonderful "spray on and rinse off" product from Lowe's which removed any green mold on the siding, let everything dry for a day and then we were ready to paint.   A few of the posts had to be scraped to remove the old chipped paint, but for the most part I just spent 3 days painting everything in sight.....
.....including the giant swings and bell post.
In the pavilion there is a wall which has a door leading to a bathroom and another double door which leads into a sort of kitchen area.   For some strange reason the squirrels found that wall enticing.  Even before we moved to the farm the grey squirrels were chewing on the trim boards on the lower portion of the pavilion wall and the bathroom door trim.   How very weird!   And what a mess.   The best solution was to remove the door and all the trim going into the bathroom and start fresh.   And that's what we did.    What a difference it made once the new trim was painted and put up.

But first, let me show you how truly ugly and icky the bathroom was.   Yes, it was bug heaven in there with dead critters lying about and spider webs attached to everything.   We had been storing an extra table in there and I was happy to retrieve it from the buggy spot it was in and give it a good cleaning.   Unfortunately, because there is no heat or A/C in there, mildew had strewn itself all over the walls.   We scrubbed the ceiling and then the walls with a mild bleach solution and the walls came back to life.   Now all they needed was a fresh coat of paint.
 Out came the non-working blinds, utility sink, mirror and shelving.
Looks pretty bad, doesn't it?   Yuk.   I was kinda grossed out by it all but we kept plugging away knowing we were only a day or two away from something a bit cleaner and prettier.
We used our extra oak table as a very convenient work station.   At least having this table to work off of saved our backs from picking tools up off the floor for the week we spent working outside.
All in all I spent 3 days painting trim pieces, over and over so each piece had at least 2 coats of paint on them before we installed them.
We've painted so much of the farm since moving here that I have a pretty hefty stockpile of paint buckets in storage.  The lid of each paint can  is marked with a Sharpie pen in large letters which room or outdoor structure that particular paint belongs to, which makes it so easy when I go in to pick up a can to do touch ups.   We had enough left over paint from doing the outside of the studio breezeway that I could paint this main wall tan to match the other outbuildings.   I even had enough leftover paint to do the entire bathroom and the floor.

Joel came down to the pavilion after I put up these galvanized letters and looked at me with a quizzical look on his face. He asked me what "WOF" meant......duh.....Whispering Oaks Farm!   We both giggled....not so sure the letters will stay up there but for now they're there.
This is the finished product!   The floor is freshly painted with porch paint and I pulled a few rustic items from my stash of decorating goodies up at the house to complete the look of an outside farm-y bathroom.
 I used some burlap and fabric from the sewing room to make cute little cafe curtains and hung a boxwood wreath above it.....just because it brought a touch of life to the room.
 I pulled this table off of our screened in porch and put it to work holding extra toilet paper and a retro fan to aid in air circulation.
 During the winter we found this cabinet and sink on sale at Lowe's and snapped it up knowing we were going to be doing this remodel this summer.   The narrow profile worked perfectly in our small space.
 In case you can't read it very well, the sign above the sink says, "Put on a little lipstick, you'll be fine".   I love it!  Just a little sass from me to those using the facilities.

And so, just in time for the picnic, we finished yet another remodeling project.   Whew!   Chalk that one off our list.
Debbie

Monday, February 1, 2016

Second Anniversary

This is what our sunsets look like most evenings.   There is some kind of phenomenon that makes the skies above the mountain glow pink.....my favorite color!   It happens a few minutes after the sun has dipped below the horizon in the west....but the color always shows up toward the mountains in the east.   I know our local TV weatherman has explained what causes the pink glow, but I only caught the tail end of his explanation, so, I'll have to do some research before I can divulge what really causes the lovely glow.
Meanwhile, I have the final reveal of the breezeway to show you today.    Joel and I finished all the work 3 weeks ago.  I know, I know, I should have shown you these pics then.   Well, as soon as we finished all the work, I had 2 days of cleaning up the construction mess, and then 2 days of cleaning the rest of the house and grocery shopping to do before driving to Alabama to pick up my friend, Barb.  

I was supposed to drive down there and stay overnight at her house, but Joel sprained his ankle the day after we finished the breezeway while putting away some tools.   He had been on crutches for a couple of days and I didn't feel comfortable staying away overnight which would force him to take care of all the animals by himself.....all the while he was slightly incapacitated.   So, I drove down and met Barb and Chuck at a small town just north of their house and Barb and I drove straight back to the farm.

It was the first time Barb has been here since the month before we moved to the farm.   And it was the first time she got to see the farmhouse since we did all the remodeling work, including the new kitchen and bathrooms.  Well, Barb was here just short of one week, and then I had daytime company several days after taking Barb back to Alabama.   Whew!!    So that was our last few weeks.   Busy, busy.   Now Joel and I have settled into a nice calm wintertime routine and are thoroughly enjoying all our remodeling efforts.

And speaking of remodeling.   Today, it is exactly 2 years since we moved here from Florida.   It's hard to believe how much has happened in such a short span of time.   And we're still having fun....despite all the hard work taking care of animals and doing one project or another on the farm.   We truly feel blessed to live the life we have here in Tennessee.

Now, on to the pics of the completed breezeway.
Here we were putting up trim work.   The window and doorway on one side is done.
It was too cold to paint outside, so, I tarped the floor in my studio and used saw horses to paint the trim, trying to stay one step ahead of Joel's schedule for installing the trim.
Here is the closed in "chase" which hides the wires and pipes for the Mitsubishi unit on the wall in the next room.  We're getting closer to done now!
And now you can see that we finished the flooring in the breezeway and closed the gap between the two different floors with a threshold.   Works like a charm.   And the trim is all done surrounding both doors.     I even got the holes patched in the porch where Joel had to fish wires to complete the electrical.
I'm so glad Joel made the decision to put the window in the breezeway.   It would have been like a cave in that small space without all the natural light that now floods the room.
AND, the armoire fits beautifully in this space now.   It is packed full of all my scrapbook supplies....out of sight, thankfully.    The picture on the wall is my dad's mom which was taken when she was 14 back in the early 1900's.   I love that picture of her!   I've begun collecting old plates to place on the wall surrounding her picture and will put those up eventually.
And now here is the view from my studio looking into the closed in porch.   I can't believe how much function we have packed into such long narrow spaces.     The porch has the mud room we built last year, the two freezers with our pork in it....and this.....
 Our old cappuccino bar......it has been sitting around collecting dust while we finished up our project.  Now it house a whole host of items inside and the top provides a space to decorate using some of our remaining items from the move.
There was even enough room to the left of the cappuccino bar to put a leftover round table.   Hmmm, now what to put on it?    I rummaged around my old linens and found this 1950's tablecloth in lime and brown....the same colors as the area rug on the porch.  
I brought out my Victorian hot chocolate set that Joel bought for me one of my birthdays long ago.   Now I get to enjoy seeing it every time I walk over to the studio.  
See what I mean about the rug "working" well with the tablecloth in the previous picture?    And, just what, you may ask, am I looking at here?   Well, it's an antique record album cabinet.   See all the slots for the albums to line up in?    Now it is extra storage for odds and ends.   On top of the cabinet on the right is our grain mill and the long object on the left is our black walnut cracker.   I believe I'll start looking for a large piece of butcher block to lay over the entire piece, and then I can permanently attach both the grain mill and the nut cracker solidly to the block.   Yup, I think that's what we'll do.  

Well, that's the grand tour.    It feels wonderful to have the breezeway completed.   Not only does it allow me free access to my studio at any time, but now all the construction materials and tools are put away and the narrow 7-1/2' porch is as artfully staged with our furniture as is humanly possible.   It has taken us 2 years to get to this point, but we're really pleased with how much function we have carved out of this long narrow porch specifically and the whole small farm house in general.  

Now it's time for a long winter's rest,
Amen & Amen,
Debbie